Video Camera Help
Watching Live Video & Controlling Video Cameras
Our video camera pages let you watch live video from our seafloor cameras. If you are a registered camera operator, you can also control video cameras.
Quick Instructions
If you want to watch live video
- Log in - You need to log in to view live video. If you haven't registered, it's easy to create a new account.
- Open one of the camera windows
- Watch the live video.
- Click the Users tab to see who's operating the camera and who else is watching.
- Add your own annotations if you see something interesting.
If you want to operate a camera
- Log in - _You need to log in to view live video. To operate a camera, you need to be a registered camera operator; if you want to become an operator, tell us about your research idea.
- Open one of the camera windows
- Power on the camera lights. (20% or less is needed for our low-lights cameras.)
- Adjust pan and tilt to explore the field of view.
- Use Messages tab to chat with other operators.
- Use Camera Presets to move camera to saved positions.
- Use Automated Observations to move camera through predefined observation routines.
Tips
- Expect a several-second delay after you click a control – it takes time for your command to be relayed to the seafloor, and the resulting video to be streamed back to you.
- Lights-on time is generally limited to one hour per day to minimize light pollution.
- Our black & white cameras are very sensitive to light - often just a few percent light power is sufficient to see well.
- Having the lights on over 50% while moving the camera can cause the system to shut down.
- Lasers cannot be turned off; they are used to scale images and are separated by 10cm.
- Horizontal and vertical rulers are also present in the field of view to help with onscreen measurements.
- If the camera controls are unresponsive, contact NEPTUNE Canada to request the camera driver be restarted.
Detailed Instructions

Live Video Window

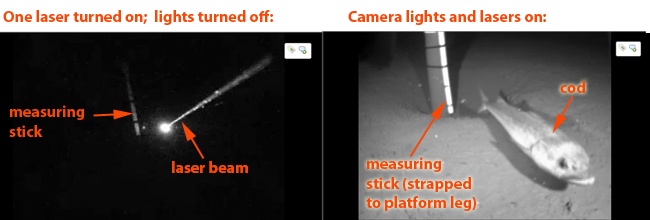
The upper-left panel lets you watch live video from cameras on the seafloor. Although the cameras are usually powered on, the lights are only powered for limited time periods. We need to restrict our use of lights in sensitive deep-sea environments, which are normally dark all the time. On some cameras, the laser beams stay on all the time (as shown in the above-left image).
Annotations

Anyone can add an annotation, whether you're a camera operator or not.
Full Annotations
If you see something of interest, click the Add Full Annotation button, and describe what you've seen. You can also define a time period for your comment, either as a point in time, a period of time, or an indefinite length of time. If you click Share, your annotation will be shared with others (this cannot be undone). You can also click Flag to mark an annotation as something to be reviewed later.
Quick Markers
If you don't have time to fill in the details for an annotation, click the Quick Marker button. This will save your annotation as a placeholder, which you can review and add to later.
Info, Users & Messages

Info and communications are available via the tabs in the upper-right section of the window.
Map
The Map tab shows the camera location on a map.
Info
The Info tab shows the camera geographic coordinates and depth. Follow the Documentation and Device Details links for additional info about the camera.
Users
The Users tab shows currently logged-in people who are also watching the same live video. Watchers can see what's happening, but are not able to control the camera or send messages.
Messages
The Messages tab is different for operators and watchers:
- Watchers can see any All Users messages sent by camera operators.
- Camera operators can share private chat messages with other camera operators (choose Operators Only). Operators can also post message that both operators and watchers can see (choose All Users). For example, operators might want to describe their research objectives or the focus of the current live camera session.
Controlling Video Cameras
If you are a registered camera operator, you can control a NEPTUNE Canada video camera through the web. This includes, adjusting lights, pan, tilt, zoom and focus. Also, you can move the camera to preset locations and run automated observation routines. All of these controls are described below.
Lights, pan & tilt

Camera lights are controlled by sliders; move them up and down to brighten/dim the lights. Our low-light cameras are quite sensitive – 3% is generally sufficient for a good view of the seafloor environment.
There are five ways to control the camera pan & tilt:
- Adjust the vertical and horizontal sliders (at left and below the full viewing range picture).
- Type numbers directly into the pan and tilt value boxes, then type Enter or Return.
- Click the left/right arrows under Pan and the up/down arrows under Tilt to nudge the camera position.
- Click the Sweep arrows to begin a continuous movement from the current location to the edge of the viewing area.
- Click directly on the full viewing range picture.
Zoom & Focus
Some cameras provide Zoom and Focus controls, which you can adjust either by moving the sliders or typing numerical values into the settings boxes.
Camera Presets

Using Presets
Camera presets let you move the camera to predefined positions. In the above illustration, a preset called Start Line 1 is defined as 30° tilt, -155° pan and both lights at 20% brightness. After selecting a preset, click Run to move the camera to your chosen preset.
Defining Presets

You can also define new camera presets, which you can save for your own use or share with others. To do so:
- Choose New Camera Preset from the drop-down menu.
- Move the camera to your chosen location.
- Set the lights (and zoom/focus if available) how you want them.
- Type a description of your new preset in the Description box.
- Click Public if you want your preset to be available to other camera operators.
- Click Save, type the name of your new preset in the Preset name window that pops up.
Automated Observations

Using Automated Observations
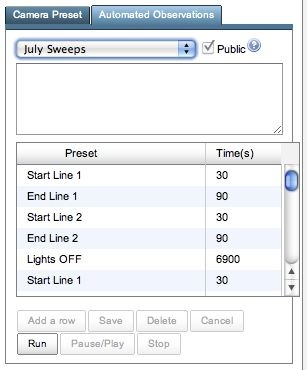
Automated observations move the camera through a series of presets in sequence. This makes it possible for you to repeat the same observation protocol each time you use the camera.
The above illustration shows a public automated observation sequence titled July Sweeps. It begins at the Start Line 1 preset, waits 30 seconds, then moves to End Line 1, pauses 90 seconds, moves to Start Line 2 and so on. To run a saved observation routine, choose it from the dropdown list, then click Run.
Defining Automated Observations

You can also define your own automated observation routines, which you can save for your own use or share with others. To do so:
- Choose New Automated Observation from the drop-down menu.
- Click Add a row. (Each "row" is a new step or command in the automated observation routine.)
- Choose a preset for the row by clicking the drop-down menu that appears in the Preset column.
- Click the time period (initially set to 0) and type in the number of seconds you want the camera to pause after reaching the preset location before advancing to the next step.
- Continue adding rows (steps) to the routine, with pause times, until your routine is fully defined.
- Reorder command steps by clicking the blue up/down arrows in the preset table.
- Remove commands from the routine by clicking the red X symbol. (This does not delete the preset, but simply removes it as a step in the routine.)
- Use the Run, Pause/Play and Stop buttons to test your routine.
- Click Public if you want your automated observation routine to be available to other camera operators.
- When your definition is complete, click Save.


