| Tip |
|---|
Register for an Oceans 3.0 account & get more features
|
| Table of Contents |
|---|
Related Links
What is it?
SeaTube V3 is our 3rd generation viewer and annotation tool for underwater dive videos, including these features:
- Changeable base maps
- Configurable layout
- Configurable ROV sensor display
- Quick annotation entry
- Powerful filtering and search tools
- Annotation taxonomy support + CMECS annotations
Which version should I choose?
From the main menu, you can choose which version of SeaTube to use:

If you want to view videos from fixed cameras positioned on the seafloor or onshore, use SeaTube Pro.
For viewing or annotating video from Remotely Operated Vehicle (ROV) dives, you should use SeaTube V3.
How to use SeaTube V3
1. Choose a Dive
| Panel | ||||||||||||
|---|---|---|---|---|---|---|---|---|---|---|---|---|
| ||||||||||||
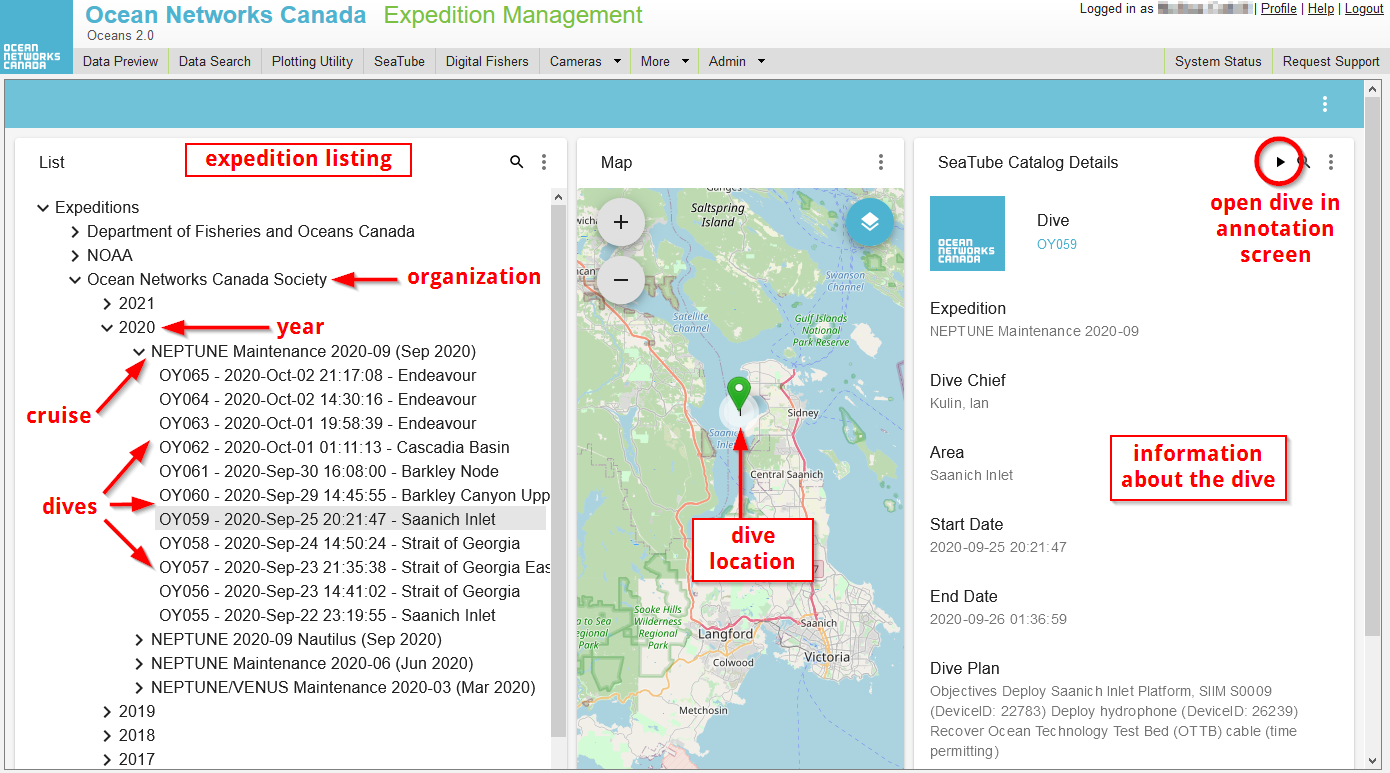
In Expedition Management, all dives are listed by organization, year, and cruise. Find the dive you want and click on the
|
2. Choose a Layout
| Panel | ||||||||||||
|---|---|---|---|---|---|---|---|---|---|---|---|---|
| ||||||||||||
| Use the Layout Settings 3-dot menu to choose a predefined layout.
|

Customize Your Layout
| Panel | ||||||||||||||
|---|---|---|---|---|---|---|---|---|---|---|---|---|---|---|
| ||||||||||||||
Optional In addition to the predefined layout, you can drag, resize and remove individual panels. You can also revert to predefined layouts with a single click.
|

3. Get to Know the Widgets
| Panel | ||||||||||||
|---|---|---|---|---|---|---|---|---|---|---|---|---|
| ||||||||||||
A number of different widgets or panels are available within SeaTube:
|

Map Widget
| Panel | ||||||||||||
|---|---|---|---|---|---|---|---|---|---|---|---|---|
| ||||||||||||
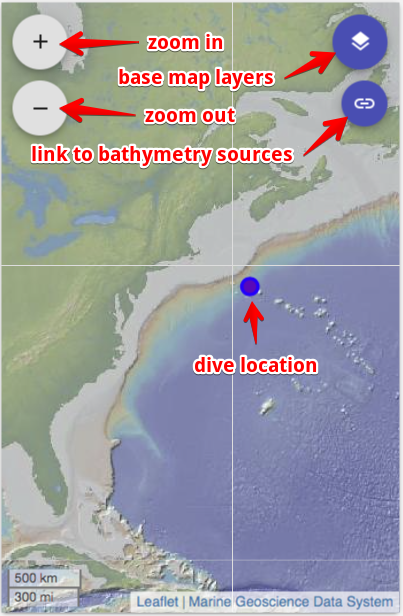
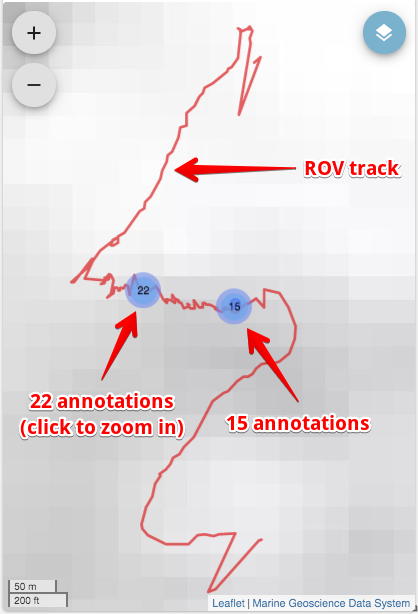
When you open a dive in SeaTube V3, a map is displayed. This zoomable map shows seafloor bathymetry along with the track along which the Remotely Operated Vehicle (ROV) followed during the dive. Clicking a dot on the track line takes you to that point in the video.
|
Video Widget
| Panel | ||||||||||||
|---|---|---|---|---|---|---|---|---|---|---|---|---|
| ||||||||||||
The video widget lets you:
|
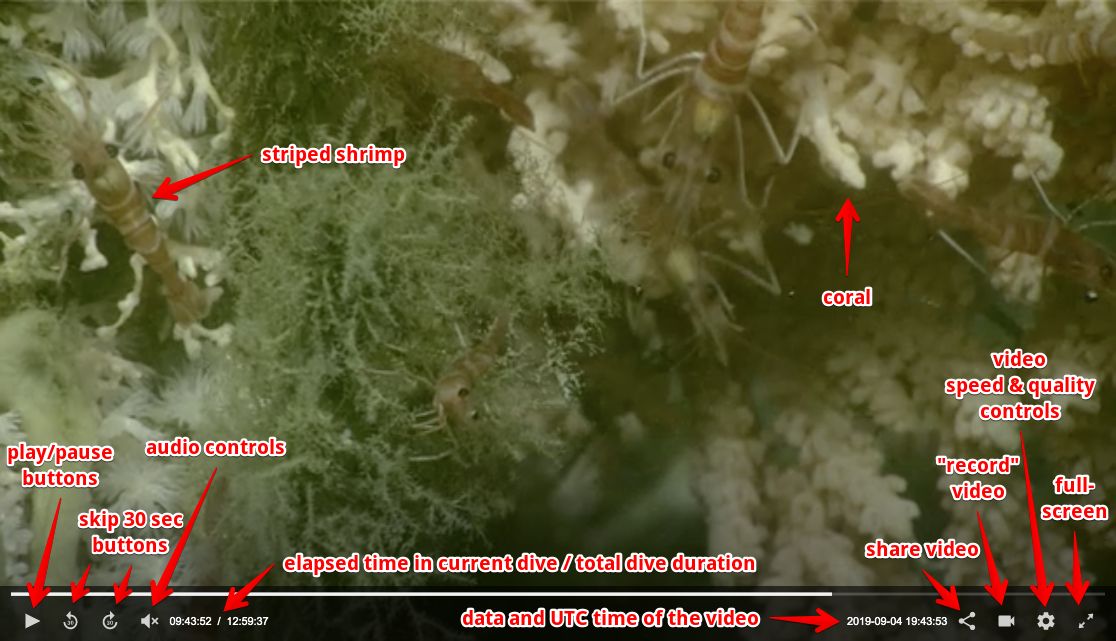
Recording Video Clips
| Panel | ||||||||||||
|---|---|---|---|---|---|---|---|---|---|---|---|---|
| ||||||||||||
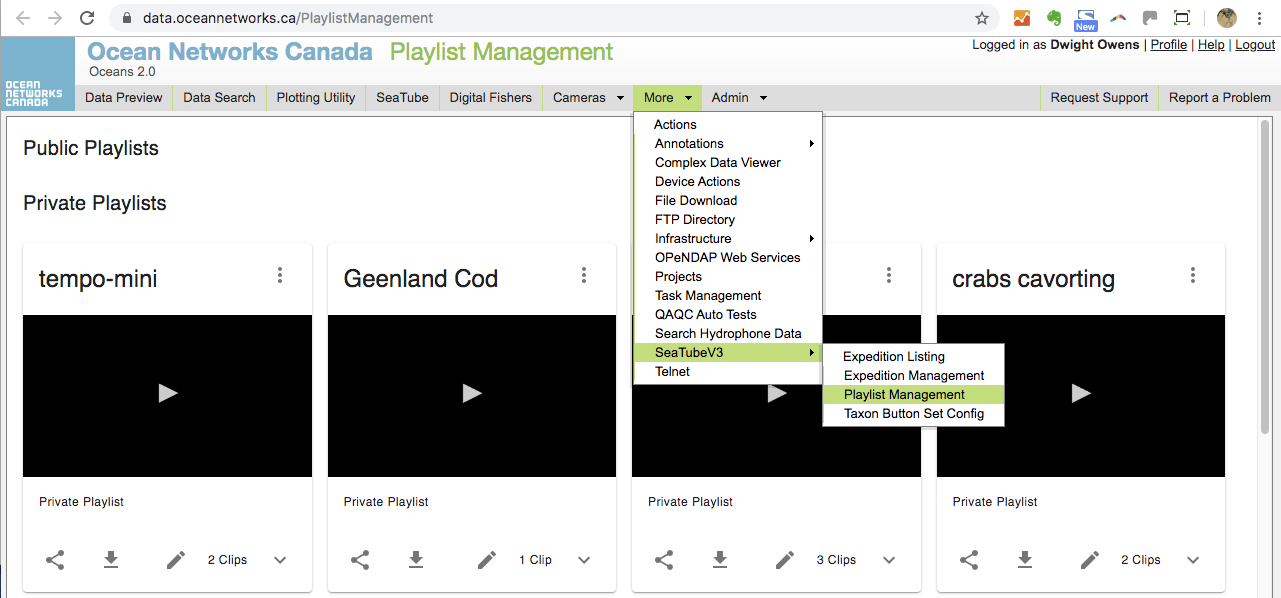
| You can save video segments to your personal playlist. Use the camera icon to start and stop recording for your segment. When you stop recording, you will be asked to add your video to a new or existing playlist. (Watch demo video.) After recording your video clip segments, you can view them from the Playlist Management screen: |
Annotation List Widget
| Panel | ||||||||||||
|---|---|---|---|---|---|---|---|---|---|---|---|---|
| ||||||||||||
| This widget lets you browse and filter annotations on the video. Use filtering to show only the annotations containing a certain word or created by a certain individual. You can also filter by additional options such as date, depth, temperature range, oxygen levels, etc. After you choose filtering options, don't forget to click Apply Filters. You can remove filtering by clicking Clear Filter.
|

Sensor Readings Widget
| Panel | ||||||||||||
|---|---|---|---|---|---|---|---|---|---|---|---|---|
| ||||||||||||
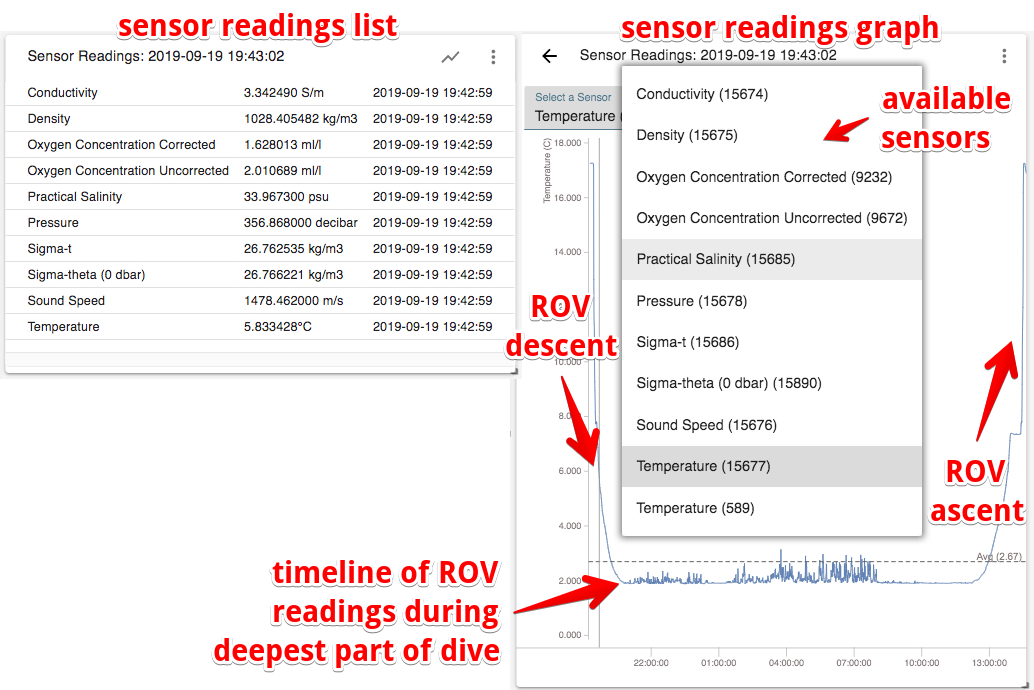
You can view readings from instruments attached to the Remotely Operated Vehicle during a dive. When first displayed, they are shown in numerical form, updated for each annotation. You can switch to graphical display sensor readings over time.
|
Dive Details Widget
| Panel | ||||||||||||
|---|---|---|---|---|---|---|---|---|---|---|---|---|
| ||||||||||||
Here you can find information about the currently selected expedition and Remotely Operated Vehicle (ROV) dive. The Oceans 3.0 video archives hold video recordings from numerous expeditions and dives by many different ROVs.
|

Making Annotations
Basic Annotation Entry
| Panel | ||||||||||||||
|---|---|---|---|---|---|---|---|---|---|---|---|---|---|---|
| ||||||||||||||
The annotation entry widget is both powerful and customizable.
You can use taxonomies to standardize annotation entries. This makes them easier to find by filtering as well. |

| Panel | ||||||||||||
|---|---|---|---|---|---|---|---|---|---|---|---|---|
| ||||||||||||
Quick Entry: Button SetsYou can use button presets to enter annotations quickly—at a single click.
You can choose from button sets that have already been prepared, or you can make your own custom button sets (explained in Advanced Tools below). Quick Entry: Keyboard EntryYou can also use keystrokes for quick entry. Use the number keys to create annotations corresponding to that button number. |

Attributes
| Panel | ||||||||||||
|---|---|---|---|---|---|---|---|---|---|---|---|---|
| ||||||||||||
In addition to taxonomies and taxons, you can add attributes, such as count, material, or morphotype, to your annotations. Attributes are standard pieces of information that are commonly used in annotations.
|

Annotation Mode: Historic vs. Live
| Panel | ||||||||||||
|---|---|---|---|---|---|---|---|---|---|---|---|---|
| ||||||||||||
Within SeaTube V3, you are able watch and provide annotations for either Live Video (from a dive that is in progress), or Historic Video (video that has been archived for a dive in the past). Toggle between Historic and Live modes by clicking the toggle buttons in the upper-right corner of the SeaTube V3 window.
Note that this feature is only available when a dive is currently in progress; for previously completed dives Historic mode is the only option, so the toggle icons do not appear. Historic Mode
This is the default mode for SeaTube V3 dive video, and active whenever the main SeaTube Annotation window is first opened, whether a current dive is in progress or not. Upon entry, the Video widget will start playing the archived video from the start of the dive, and any previously entered annotations will appear in the Annotation List widget. All widgets (Map, Annotation List, and Sensor Readings) will highlight the values synced to the current video position time. You can advance/rewind the video using the provided controls, or click on an annotation in the Annotation List to reset the video to corresponding point in time. Creating an annotation will by default use a timestamp that corresponds to the current point in time of the video being displayed. “Capture Time” will capture the current video time; the user may also enter/edit the time to be used using the controls provided. Live Mode
This mode enables annotation teams to watch a live video feed and create annotations based on what they are witnessing in real-time. By default annotations that are created will utilize the current time for the timestamp (as provided by their personal computer OS). “Capture Time” will capture the current system time; the user may also enter/edit the time to be used using the controls provided. During Live mode, the user is not able to click on a previous annotation and watch the video from that point; in order to do so, they must switch to Historic mode. Notes Given the delays in receiving and re-streaming live video through SeaTube, some organizations (such as NOAA) require annotators to watch a more direct video stream to minimize these delays, but still prefer that the annotation time default to the current system time. To enable this, the organization will provide a separate video URL for their users to watch in one browser window, while entering annotations via SeaTube V3 in a separate browser window. To make sure the user is not confused with more than one video stream playing at once, they configure SeaTube V3 to not display any video while in Live mode. Both NOAA and ONC are working on an enhanced solution that would allow the video time to be embedded directly in the video itself, which will resolve the original issue of the time delays between receiving a video stream and creating an annotation for a precise point in time. |


Searching Annotations
Seatube Search
| Panel | ||||||||||||
|---|---|---|---|---|---|---|---|---|---|---|---|---|
| ||||||||||||
In addition to the filter search in Annotation List, you can search through all video annotations to find video segments and annotations of interest. SeaTube Search allows you to scope your search by expedition(s), dive(s) and many other filter parameters.
|

Managing Expeditions & Dives
Expedition Listing
| Panel | ||||||||||||||
|---|---|---|---|---|---|---|---|---|---|---|---|---|---|---|
| ||||||||||||||
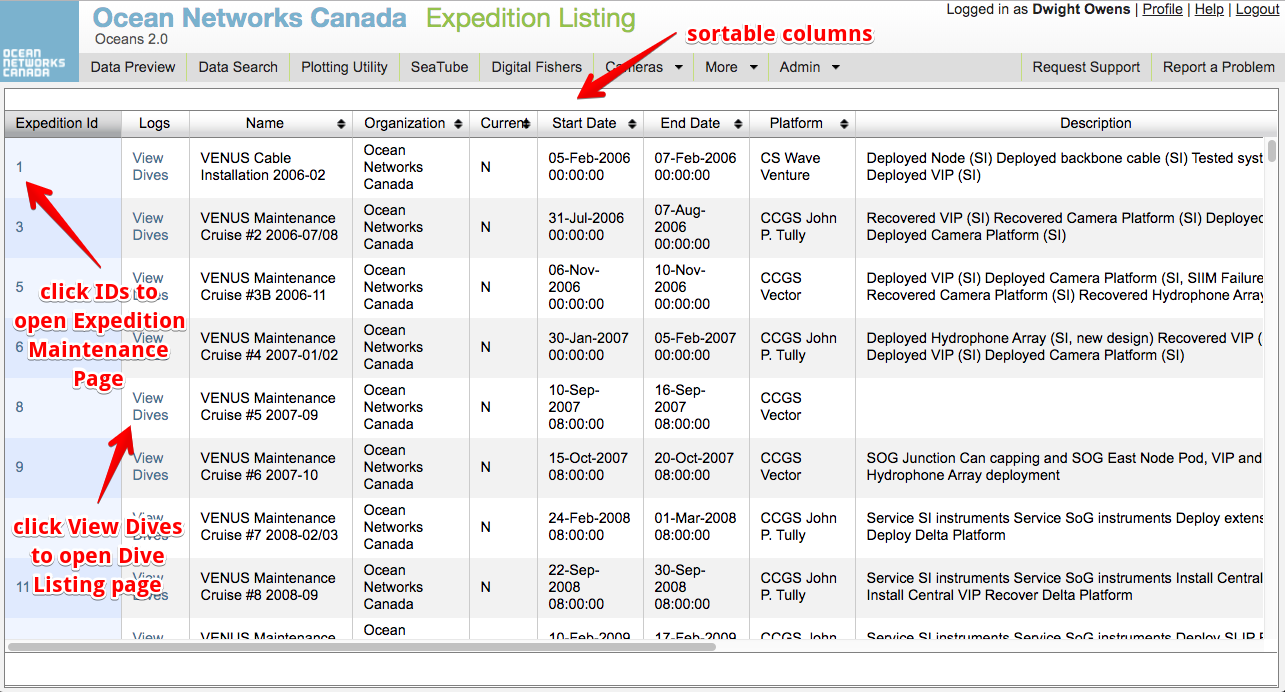
The Expedition Listing page shows all expeditions catalogued within Oceans 3.0 since 2006. Not all expeditions had ROV dives with video recordings.
|
Create a New Dive
| Panel | ||||||||||||
|---|---|---|---|---|---|---|---|---|---|---|---|---|
| ||||||||||||
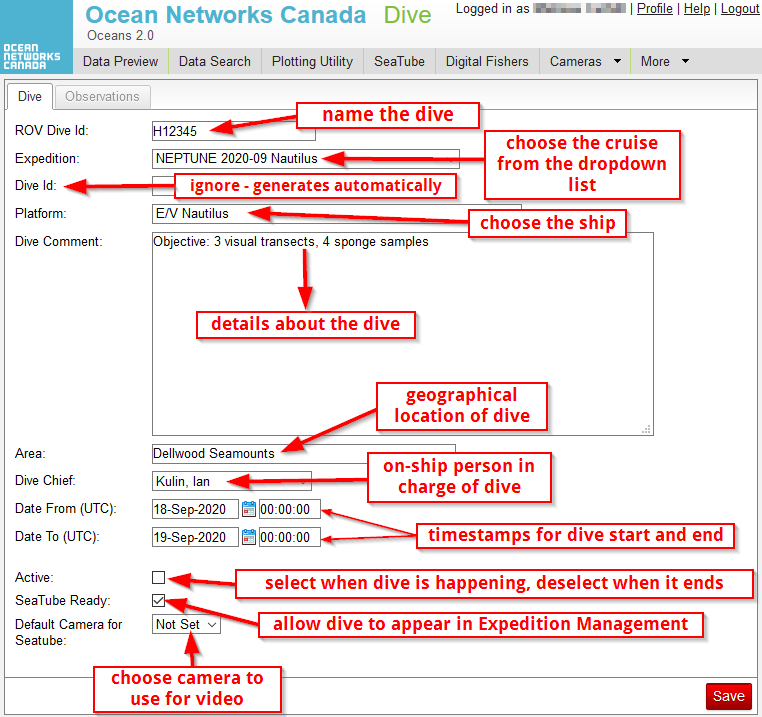
While Expeditions are usually set up by ONC staff, users with administrative permissions can create their own Dives through the Expedition Listing page. Find the Expedition you want to add a dive to from the list and click on View Dives to go to the Dive Listing page:
Click red 'Add' button:
|


Advanced Tools
Taxonomies
| Panel | ||||||||||||
|---|---|---|---|---|---|---|---|---|---|---|---|---|
| ||||||||||||
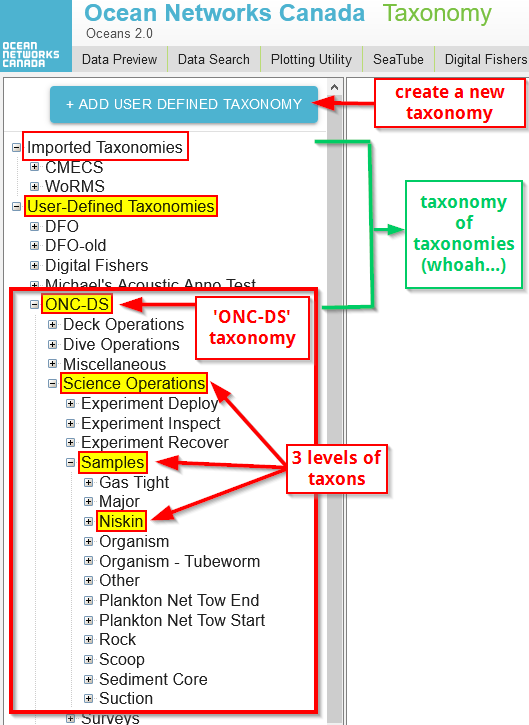
Taxonomies are hierarchical lists of standardized annotation types called taxons. There are two kinds of taxonomies in STv3: Imported and User-Defined. If you have admin privileges for your organization in SeaTube v3, you can create and edit User-Defined taxonomies in Taxonomy Management. The taxonomy list
|

Attributes
| Panel | ||||||||||||
|---|---|---|---|---|---|---|---|---|---|---|---|---|
| ||||||||||||
New attributes can be created by admins in Attribute Management. Attributes can be organized into custom Attribute Groups to make them easier to find.
|

Buttons
| Panel | ||||||||||||||
|---|---|---|---|---|---|---|---|---|---|---|---|---|---|---|
| ||||||||||||||
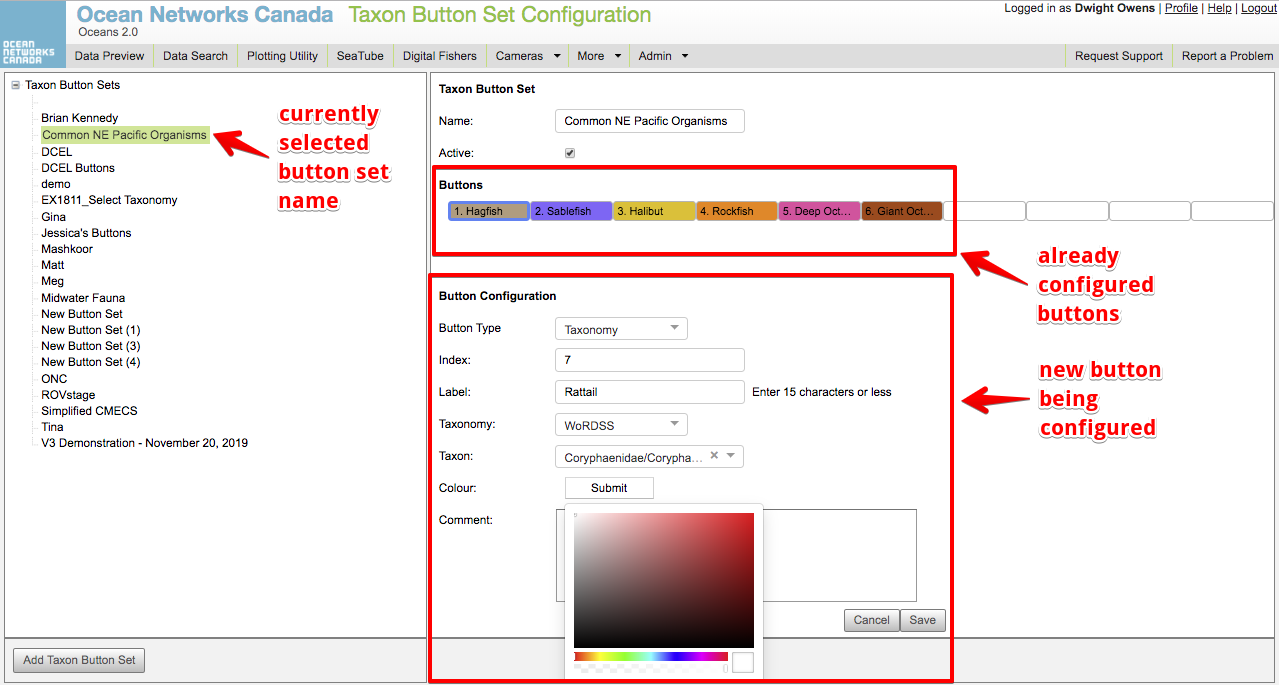
Custom Quick-entry ButtonsYou can create your own custom button sets using the Taxon Button Set Configuration screen. Buttons are based on either taxonomies or attributes.
|
On-ship Dive Logging
The SeaTube V3 dive logging functionality can be implemented on different ships that ONC uses to conduct field work, and supports logging dives on many different Remotely Operated Vehicles (ROV). ONC can also provide this service to other organizations that wish to use this tool during their expeditions. The system supports simultaneous dive loggers, ships, and ROVs that may be required for operations. If a satellite connection is available, the dive logs can be synchronized between ship and shore. Otherwise, the dive logs are synchronized once the ship-based server is back on-shore.
Two quick-reference guides have been created to support our clients that are using this tool (in addition to all the other help information in this page):
- Getting Started: On-ship Dive Logging
- On-Ship Logging SeaTube v3 UI OverviewGuide
Expert Review
View the SeaTube V3 Expert Review Help page for information on how to review annotations and get your name accredited to ONC published datasets!
...