| Tip |
|---|
Register for an Oceans 3.0 account & get more features
|
What is it?
Data Search provides data processing and visualization for both scalar and complex data products. Results with accompanying metadata reports can be published in scientific papers. Many more instrument types are searchable than in Data Preview, including hydrophones, sonars, vertical profilers, ship data and cameras. Documentation on data products is here: Data Products Home.
Using a shopping cart model, you can create and download multiple searches at your convenience. If you log in with an Oceans 3.0 account, your previous data searches are retained.
Why is this useful?
Searching massive data sets over time can generate huge data downloads. Data Search gives you options such as averaging, Min/Max and selecting Clean or Raw data to control the amount of data you wish to process for downloading.
A search history lets you start a search while at one location (e.g., work) and then check in on that search from somewhere else (e.g., home).
If you are interested in large amounts of data, you can first sample and explore subsets via Data Search, then automate your big downloads via ONC's Application Programming Interface.
How to use Data Search
| Panel | ||||||||||||
|---|---|---|---|---|---|---|---|---|---|---|---|---|
| ||||||||||||
Step 1: Browse Data SourcesWhen you first open Data Search, the list and map display all data source locations in the Ocean Networks Canada archive. Choose Instruments by Location, Instruments by Category, or Properties (measurements) by Location.
(click to enlarge) |

| Panel | ||||||||||||||
|---|---|---|---|---|---|---|---|---|---|---|---|---|---|---|
| ||||||||||||||
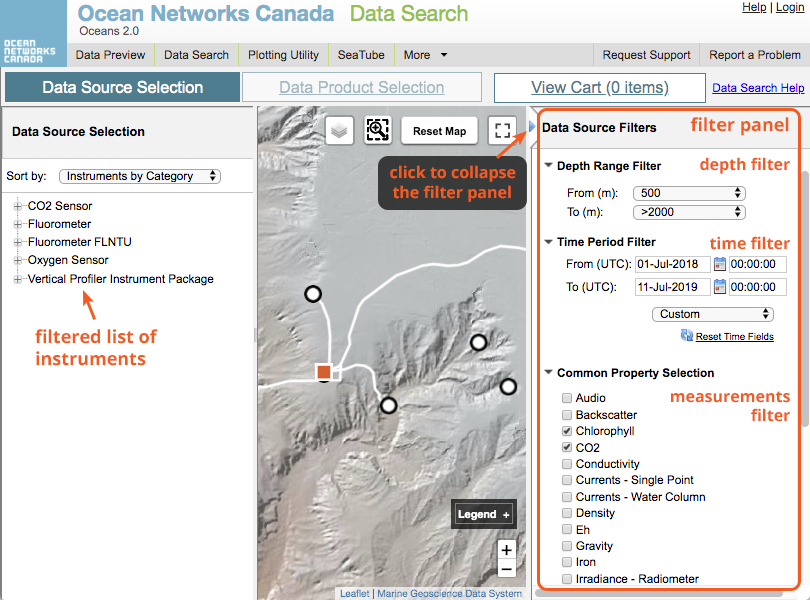
Step 2: Use the Filters.The filter panel at right lets you refine the list of Instruments and Measurements by filtering for Depth, Time Period, and Property. Click the blue triangle to hide and show the filter panel.
(click to enlarge) |
| Panel | ||||||||||||||
|---|---|---|---|---|---|---|---|---|---|---|---|---|---|---|
| ||||||||||||||
Step 3a: Choose an Instrument or Property from the list.After you make a selection, a dark grey box lists all Devices (instruments) that have measured your Property of interest at that Location. Click the red Select This Data Source button to continue.
(click to enlarge) |

| Panel | ||||||||||||
|---|---|---|---|---|---|---|---|---|---|---|---|---|
| ||||||||||||
Step 3b: Choose an Instrument or Property from the map.You can also zoom the map and click icons on the map to select instruments. After selecting an Instrument or Property, click the red Select This Data Source button to continue.  (click to enlarge) |
| Panel | ||||||||||||
|---|---|---|---|---|---|---|---|---|---|---|---|---|
| ||||||||||||
Step 4: Choose Data ProductsThe Data Product Selection tab lets you decide how you want the data prepared. For the instruments listed over your requested time period, you can choose data product formats, and delivery options.* When you have made your selections, click Add to Cart.
(click to enlarge) *Note: sometimes when multiple products are chosen, the processing options are not applied to all. If this occurs, you can choose to process and download them one at a time. |

| Panel | ||||||||||||
|---|---|---|---|---|---|---|---|---|---|---|---|---|
| ||||||||||||
Step 5: View the CartOn the View Cart tab, your requested data products appear in the Open Cart box. Click the checkbox for each prduct you want processed and packaged. Review your search parameters, and when you're satisfied click Checkout All. Your products will processed and bundled into a zip file for you. If the process job is very large, you can log out and return later to download the finished file.
(click to enlarge) |

| Panel | ||||||||||||
|---|---|---|---|---|---|---|---|---|---|---|---|---|
| ||||||||||||
Step 6: Download and/or DeleteAt any point you can review your search cart. You can decide to delete your request before, during or after searches are executed. Nothing is downloaded to your computer until you click the Download button. If you are logged in to your account, completed product files are stored for you to download up to 14 days later.
(click to enlarge) |

| Panel | ||||||||||||
|---|---|---|---|---|---|---|---|---|---|---|---|---|
| ||||||||||||
Step 7: Opening Search ResultsAfter your search has completed, you can download the result. If you requested more than one file, they will be bundled into a zip file. Open it with a zip compression program that supports 64-bit file format.  (click to enlarge) |
...